====================================================
http://blog.csdn.net/meshless/article/details/6941499
===================================================
前几天学习下了桌面组件开发,现将学习心得跟大家交流下,欢迎探讨!
一、 概述
要进行桌面组件Widget开发,首先要了解AppWidget框架结构。AppWidget是Android 1.5平台推出的一种崭新的应用程序框架。基于AppWidget框架,开发人员可以在OPhone及模拟器上开发形似传统widget的小应用程序,并将其嵌入到其他应用中。
二、AppWidet框架
1、AppWidgetProvider:继承自 BroadcastRecevier , 在AppWidget 应用 update、enable、disable 和 delete 时接收通知。其中,onUpdate、onReceive 是最常用到的方法,它们接收更新通知。 下面对AppWidgetProvider类常用到的方法进行介绍:
(1)onDeleted(Context context, int[]appWidgetIds)
(2)onDisabled(Context context)
(3)onEnabled(Context context)
(4)onReceive(Context context, Intentintent)
Tip:因为 AppWidgetProvider 是继承自BroadcastReceiver 所以可以重写onRecevie 方法,当然必须在后台注册Receiver
(5)onUpdate(Context context,AppWidgetManager appWidgetManager, int[] appWidgetIds)
2、 AppWidgetProvderInfo:描述 AppWidget 的大小、更新频率和初始界面等信息,以XML 文件形式存在于应用的res/xml/目录下。
3、AppWidgetManger :负责管理 AppWidget ,向 AppwidgetProvider 发送通知。 下面对AppWidgetManger 类中主要方法进行介绍:
(1)bindAppWidgetId(int appWidgetId,ComponentName provider)
通过给定的ComponentName 绑定appWidgetId
(2)getAppWidgetIds(ComponentNameprovider)
通过给定的ComponentName 获取AppWidgetId
(3)getAppWidgetInfo(int appWidgetId)
通过AppWidgetId 获取 AppWidget 信息
(4)getInstalledProviders()
返回一个List<AppWidgetProviderInfo>的信息
(5)getInstance(Context context)
获取 AppWidgetManger 实例使用的上下文对象
(6)updateAppWidget(int[] appWidgetIds,RemoteViews views)
通过appWidgetId 对传进来的 RemoteView 进行修改,并重新刷新AppWidget 组件
(7)updateAppWidget(ComponentNameprovider, RemoteViews views)
通过 ComponentName 对传进来的 RemoeteView 进行修改,并重新刷新AppWidget 组件
(8)updateAppWidget(int appWidgetId,RemoteViews views)
通过appWidgetId 对传进来的 RemoteView 进行修改,并重新刷新AppWidget 组件
4、RemoteViews :一个可以在其他应用进程中运行的类,向 AppWidgetProvider 发送通知。这是构造AppWidet的核心。
三、Widget示例:WidgetDemo
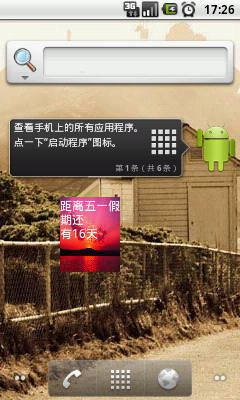
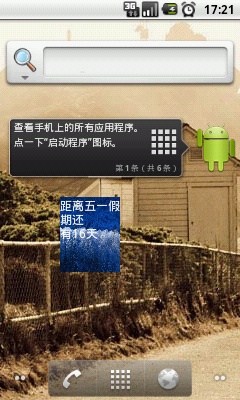
下面改写一个倒计时Demo,该Widget背景图能定时更新。
先看下程序运行效果图:
1、 新建一个Android工程,命名为WidgetDemo
2、 修改string.xml文件如下:
-
<?xmlversion="1.0"encoding="utf-8"?>
-
-
<resources>
-
-
<stringname="hello">HelloWorld,WidgetDemo!</string>
-
-
<stringname="app_name">DaysToMay1ST</string>
-
-
</resources>
3、 修改main.xml布局文件。
由于Widget是一个实现在桌面的小应用程序,对UI的设计要求高,其中包括大小的计算和界面是否适合屏幕的布局等。所以首先要建立RemoteViews对应的布局文件main.xml。
代码如下:
-
<?xmlversion="1.0"encoding="utf-8"?>
-
-
<LinearLayoutxmlns:android="http://schemas.android.com/apk/res/android"
-
-
android:orientation="vertical"
-
-
android:layout_width="fill_parent"
-
-
android:layout_height="fill_parent"
-
-
android:background="@drawable/sunset"
-
-
>
-
-
<TextView
-
-
android:id="@+id/may1st"
-
-
android:layout_width="fill_parent"
-
-
android:layout_height="wrap_content"
-
-
android:text="@string/hello"
-
-
android:textSize="12px"
-
-
android:textColor="#ff0000"
-
-
/>
-
-
</LinearLayout>
4、 建立Widget内容提供者文件。我们在res下建立xml文件夹,并且新建一个widget_provider.xml代码如下:
-
<?xmlversion="1.0"encoding="utf-8"?>
-
-
<appwidget-provider
-
-
xmlns:android="http://schemas.android.com/apk/res/android"
-
-
android:minWidth="50dip"
-
-
android:minHeight="50dip"
-
-
android:updatePeriodMillis="10000"
-
-
android:initialLayout="@layout/main"
-
-
>
-
-
</appwidget-provider>
-
-
5、 修改WidgetDemo.java代码如下:
-
packagecom.android.rui;
-
-
importjava.util.Calendar;
-
-
importjava.util.Date;
-
-
importjava.util.GregorianCalendar;
-
-
importjava.util.Timer;
-
-
importjava.util.TimerTask;
-
-
importandroid.appwidget.AppWidgetManager;
-
-
importandroid.appwidget.AppWidgetProvider;
-
-
importandroid.content.ComponentName;
-
-
importandroid.content.Context;
-
-
importandroid.widget.RemoteViews;
-
-
publicclassWidgetDemoextendsAppWidgetProvider{
-
-
/**Calledwhentheactivityisfirstcreated.*/
-
-
@Override
-
-
publicvoidonUpdate(Contextcontext,AppWidgetManagerappWidgetManager,
-
-
int[]appWidgetIds){
-
-
-
-
Timertimer=newTimer();
-
-
timer.scheduleAtFixedRate(newMyTime(context,appWidgetManager),1,60000);
-
-
super.onUpdate(context,appWidgetManager,appWidgetIds);
-
-
}
-
-
privateclassMyTimeextendsTimerTask{
-
-
RemoteViewsremoteViews;
-
-
AppWidgetManagerappWidgetManager;
-
-
ComponentNamethisWidget;
-
-
-
-
publicMyTime(Contextcontext,AppWidgetManagerappWidgetManager){
-
-
this.appWidgetManager=appWidgetManager;
-
-
switch(Declare.i)//让widget背景图定时变换
-
{
-
case1:
-
remoteViews=newRemoteViews(context.getPackageName(),R.layout.main1);
-
Declare.i++;
-
break;
-
case2:
-
remoteViews=newRemoteViews(context.getPackageName(),R.layout.main2);
-
Declare.i++;
-
break;
-
case3:
-
remoteViews=newRemoteViews(context.getPackageName(),R.layout.main3);
-
Declare.i++;
-
break;
-
default:
-
remoteViews=newRemoteViews(context.getPackageName(),R.layout.main);
-
Declare.i=0;
-
Declare.i++;
-
break;
-
}
-
-
thisWidget=newComponentName(context,WidgetDemo.class);
-
-
}
-
-
publicvoidrun(){
-
-
-
-
Datedate=newDate();
-
-
Calendarcalendar=newGregorianCalendar(2011,05,01);
-
-
longdays=(((calendar.getTimeInMillis()-date.getTime())/1000))/86400-30;
-
-
remoteViews.setTextViewText(R.id.may1st,"距离五一假期还有"+days+"天");
-
-
appWidgetManager.updateAppWidget(thisWidget,remoteViews);
-
-
-
-
}
-
-
-
-
}
-
-
}
6、 修改配置文件AndroidManifest.xml文件。
由于使用了reciever和“android.appwidget.action.APPWIDGET_UPDATE”,所以需要在AndroidManifest.xml中进行注册。
代码如下:
-
<?xmlversion="1.0"encoding="utf-8"?>
-
-
<manifestxmlns:android="http://schemas.android.com/apk/res/android"
-
-
package="com.android.rui"
-
-
android:versionCode="1"
-
-
android:versionName="1.0">
-
-
<applicationandroid:icon="@drawable/icon"android:label="@string/app_name">
-
-
<receiverandroid:name=".WidgetDemo"
-
-
android:label="@string/app_name">
-
-
<intent-filter>
-
-
<actionandroid:name="android.appwidget.action.APPWIDGET_UPDATE"/>
-
-
</intent-filter>
-
-
<meta-dataandroid:name="android.appwidget.provider"
-
-
android:resource="@xml/widget_provider"
-
-
/>
-
-
</receiver>
-
-
四、Widget事件处理
在以上五一假期倒计时的DEMO中只是更新显示了一个界面。在Widget中同样可以通过setOnClickPendingIntent方法来监听一个事件的处理。
比如:当我们点击一个”widget_button”按钮时,会弹出一个Toast提示。主要代码如下:
-
publicclasswidgetextendsAppWidgetProvider
-
-
{
-
-
publicvoidonReceive(Contextcontext,Intentintent)
-
-
{
-
-
super.onReceive(context,intent);
-
-
if(intent.getAction().equals("com.android.myapp.widget.CLICK"))
-
-
{
-
-
Toast.makeText(context,"Itworks!",Toast.LENGTH_SHORT).show();
-
-
}
-
-
}
-
-
-
-
publicvoidonUpdate(Contextcontext,AppWidgetManagerappWidgetManager,int[]appWidgetIds){
-
-
finalintN=appWidgetIds.length;
-
-
for(inti=0;i<N;i++){
-
-
intappWidgetId=appWidgetIds[i];
-
-
RemotesViewsrv=newRemoteViews(context.getPackageName(),R.layout.main);
-
-
IntentintentClick=newIntent("com.android.myapp.widget.CLICK");
-
-
PendingIntentpendingIntent=PendingIntent.getBroadcast(context,0,intentClick,0);
-
-
rv.setOnClickPendingIntent(R.id.widget_button,pendingIntent);
-
-
appWidgetManager.updateAppWidget(appWidgetId,rv);
-
-
}
-
-
}
-
-
}
Tip:"com.android.myapp.widget.CLICK"事件需要在AndroidManifext.xml文件中声明,声明方式同上面的"android.appwidget.action.APPWIDGET_UPDATE"。
五、Widget启动Activity
在Widget中同样可以启动一个Activity,比如Android自带的音乐播放器,当我们添加一个音乐播放器桌面小部件并点击”button”时就开启一个Activity来显示播放音乐的界面。
通过如下代码即可以启动一个Activity:
-
RemoteViewsrv=newRemoteViews(context.getPackageName(),R.layout.mywidget);
-
-
IntentintentActivity=newIntent(context,MusicPlayer.class);
-
-
PendingIntentpendingIntentActivity=PendingIntent.getActivity(context,0,intentActivity,0);
-
-
rv.setOnClickPendingIntent(R.id.button,pendingIntentActivity);
-
-
appWidgetManager.updateAppWidget(appWidgetId,rv);
当我们点击”button”按钮时就可以启动指定的Activity了,代码如下:
-
context.startActivity(intentActivity);
六、Widget启动Service
Widget还可以启动一个服务。比如Android自带的音乐播放器,要播放音乐肯定需要使用service在后台播放,所以就需要在音乐播放器桌面小部件中启动一个service。使用下面方法可以在Widget中启动一个Service:
-
RemoteViewsrv=newRemoteViews(context.getPackageName(),R.layout.mywidget);
-
-
IntentintentService=newIntent(“Service名”);
-
-
context.startService(intentService);
-
-
appWidgetManager.updateAppWidget(appWidgetId,rv);
分享到:


相关推荐
android 桌面组件 App widget的使用.
本文实例讲述了Android桌面组件App Widget用法。分享给大家供大家参考。具体如下: 这里模拟一个案例:把AppWidget添加到桌面后,点击AppWidget后AppWidget文本会轮回改变 main.xml布局文件: <?xml version=1.0...
本文实例讲述了Android桌面组件App Widget用法。分享给大家供大家参考。具体如下: Android开发应用除了程序应用,还有App Widget应用。好多人会开发程序应用而不会开发App Widget应用。本帖子就是帮助大家学习如何...
文档介绍了AppWidget 框架类,在 Android 如何使用 Widget,AppWidget 框架的主要类介绍,AppWidgetManger 类, 继承自 AppWidgetProvider 可实现的方法,DEMO 讲解 ,1、新建AppWidgetProvderInfo,2、写一个类继承...
一个最简单的桌面小组件开发实例。点击之后发送广播消息,接收到消息之后更新小组件上的文字。是学习AppWidge类的好例子。
NULL 博文链接:https://l12052124.iteye.com/blog/758380
Android高级应用源码-Android小部件AppWidget.zip
AppWidget是放置在手机屏幕的桌面小组件应用,如时钟、日历、天气等组件,与一般应用程序有所不同。一般应用虽也可以以图标的形式(快捷方式)放在桌面,但必须点击运行和查看;而AppWidget一般不须点击即直观呈现其...
Android 桌面小部件(widget)日签 ,展示农历阳历日期,一年进度,定时随机诗句
可将你的心情讯录并用桌面组件的形式展示于桌面上,并有丰富的表情可供选择并加载在桌面上,此功能类似于QQ上的各性签名,可以看到手机主人的心情状况不是很好,注:因为这个小程序完全是App widget 桌面组件,所以...
android桌面小组件最简实例,最少代码。
Android widget 桌面组件开发 Widget是Android1.5版所引进的特性之一.Widget,可让用户在主屏幕界面及时了解程序显示的重要信息.标准的Android系统已包含几个Widget的示例,如模拟时钟,音乐播放器等. 一、AppWidget ...
android桌面小组件官网实例 android桌面小组件
android系统的一个学习桌面插件的入门级代码程序,本来是想写成博客的,后来放弃了,因为写博客的水平有限,唉国语没学好啊。
android widget小组件,widget 和app界面通过广播,服务(service),RemoteViews 交互